I tried and tried to get this to post yesterday, but Blogspot seemed to be having issues. Here's what I said in the post that was supposed to go through yesterday:
Happy Halloween everyone! I will post a couple of pictures of what I worked on today for my craft fair, and I will post a couple of pictures of my 2 beautiful little girls.
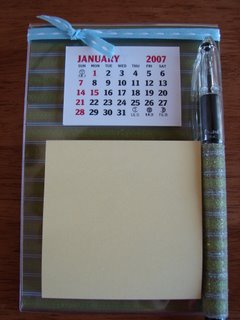
First, here are pictures of just a couple of the calendar/post-it note holders I made today.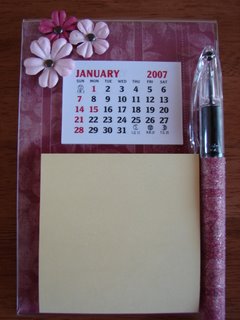
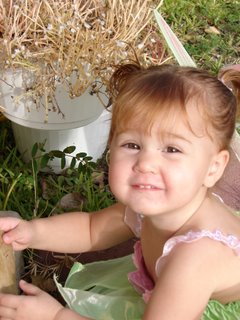
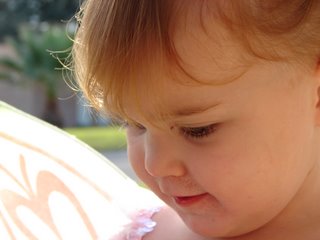
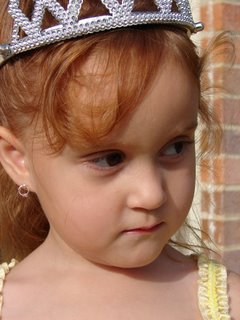
This last group of pictures are of the girls before we went Trick-or-Treating. Emma (my 3-year old) wanted to be Belle because Belle wears a yellow dress. Yellow, of course, is Emma's favorite color. Sarah (my 2-year old) was Tinkerbelle because it was the cutest costume we could find in her size. Sarah has a rash on her face, unfortunately, from being sick (like me). When a 2-year old blows their nose a lot, they tend to do a lot of wiping of their face and it has really irritated her skin. I wish I could airbrush it off!!! Anyway, enjoy!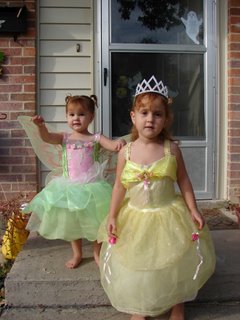
October 31, 2006
(Yesterday....) Happy Halloween!
October 30, 2006
5 Days and Counting....
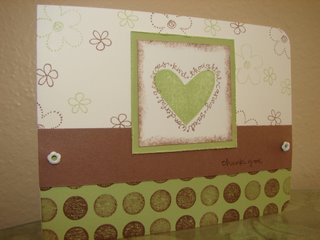
I have 5 days left until my Vendor Fair (aka Santa's Workshop) that I'm treating like a Craft Fair. This weekend I went from having about 20-something cards to 80. I figure with having the kids at home and no husband, that's a pretty good outcome. I also made 6 of those little ornaments you may have seen posted here a few days ago. Now I just have 24 more of them to make for that Demonstrator Christmas gift swap!!! Ahhh!!!! I am going to keep cranking out the cards, 6 at a time, as long as I can. Other things I plan/hope to sell are some "name" frames. I will have 3 (hopefully) made, and then people order them and tell me what name/word they want in them. I hope to have 3 saying the following: "Nicholas", "Teacher" and "Faith" as examples. The Nicholas one I will actually be making for a friend. I promised her one at the birth of their 3rd child, and first boy. He's such a cutie!! It's long overdue and this fair will make me have to crank it out for display and then I can give it to her. Other items will be checkbook covers (I may or may not leave a spot to monogram them for the customer at the fair upon purchase), beaded pens, post-it note holders, altered tins (the ones for holding greeting cards, and the band-aid sized ones), altered photo frames, domino ornaments and the little shaker ornaments, refrigerator calendars, and bags of gift tags. Sound like enough? It sure better be considering I'm not even half-way there!!!! Anyway, below are a couple of cards I made this weekend.
This first card was inspired by a friend and fellow demonstrator named Kim who was in a Christmas swap that I was in last year and she made a card similar to this one:

This next card is my favorite that I made this weekend. It opens on the right side, so it's not a typical layout for me. I usually do the skinny kind opening at the bottom like the TX snowman one above. On the side that opens, the corners are rounded - I like that look. I got the inspiration for the colors from a shirt I have that I like. I hope you enjoy it!
I should mention that like everyone else, we're getting ready for Halloween. Emma wanted to be Cinderella this whole past month - that's what she told anyone who asked. Well, Sarah's a bit on the small side, and I don't like the costumes that they sell for little kids, and I'm NOT crafty with sewing, so we weren't sure what to do for her. Finally, at good old Wal-Mart, I stumbled across a fairy costume that's pretty small. I'm sure the shoulder straps will be big, but I can pin those. It has wings, and that's a BAD thing. Emma took one look at that costume and had a fit! She wanted wings TOO!!! Insert visual of screaming child here, saying "I don't want to be Cinderella, I want wings!!!" Anyway, we didn't make a special trip for her, but when we were at Wal-Mart again (it's all we have here, don't I wish there were other choices!!) we showed her some of the costumes, and she settled on being Belle (from Beauty and the Beast). We told her about 10 times that Belle doesn't have wings, and asked her if she wanted to be Belle, or a fairy like Sarah, and she said she wanted to be Belle. We don't even have that movie! I don't really know why she wants to be Belle, except for those of you that know her absolute favorite color (since she could say any colors at all) is yellow, and - you guessed it! Belle's dress is yellow. So, we will have one little fairy and one little princess tomorrow night for Halloween. I'll be sure to post pictures!
October 28, 2006
Test
I am trying out a free feature of blogspot.com where you can subscribe to my blog simply by clicking on the "Feedblitz" link that is on the right side of your screen, a little below this post. I hope to not see the number "1" in that little orange box for long - since that "1" represents me. I hope that this post will generate an e-mail to myself letting me know of this post. We'll see. If I don't like it, I may delete the code for this function from my blog template. You know, I'm learning SO MUCH by having this blog. And I thought all of those Computer Science classes at the Air Force Academy were stupid! I think I have an easier time editing the code that is associate with my blog because of them. I'm not a pro or anything, but hopefully I'll manage! Take care, and good night! You'll hear from me next week - Sunday's my no blogging day.
What a Find!!!!
I just discovered the BEST website!!! It is a crafter's heaven with very good pricing on all kinds of items from patterened papers and card stock, to metal tins that you can alter, to Prima flowers, to ribbon, to scrapbooking kits, to die cutting systems, to scrapbook albums, and on and on!!! Here is the link to Scrap-A-Latte . They have (as far as I can tell after ordering) a 2 flat-rates for shipping either through normal USPS mail, or PRIORITY rate USPS. Don't blame me when you go broke after visiting the site. At least you got more for your money in the process!! :)
****Note**** I found that on Scrap-A-Latte, they offer a referral reward program. So, if you go to the site and buy anything, the first time you do, please follow the instructions below. It is a great deal for me, and a great deal for you when you tell your friends about it! My e-mail is mcclellans@stx.rr.com Thanks!
"We offer a Referral Reward Program! If you refer our site to a fellow scrapbooker, when they place their first order, ask them to type in your email address as the person that referred them to our store. This should be placed in the comment section of the shopping cart during checkout. If a new customer tells us they were referred by you, we will send you a gift certificate for $5.00 to use on anything in our store."
October 27, 2006
It's not even Thanksgiving Yet!
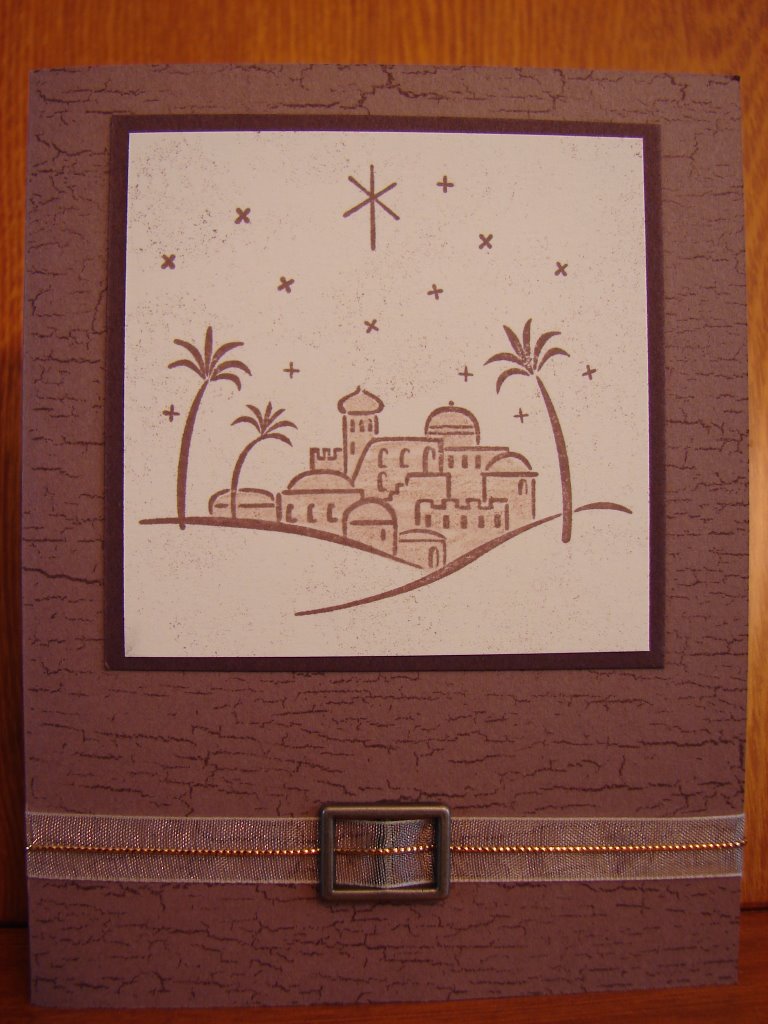
Well, Thanksgiving is still weeks away, but here I am working away at Christmas cards and other items. Some of them are for my upcoming craft show. Others are for swaps or just to have as examples at workshops. Since I skipped yesterday, I'll post 2 pictures of what I've been working on. I claim about zero originality on the ornament that you'll see here. I got the idea for it from Debbie Olson's blog Thinking Inking . I changed up the colors a bit, tied the ribbon differently, and used some little glitter stars inside instead of microbeads. I also embossed the image in ultra fine gold e.p. I thought that her use of the City of David stamp set for the stamped image was perfect. I absolutely love this set! This ornament I am going to have to make 24 of - for a Christmas Gift Swap that I'm part of with other SU! demonstrators in my up/sideline. I hope you like it! 
The card you see below is one that I made after getting the idea from SCS (SplitCoastStampers). To get to SCS, click on the link you see above on the right-hand side of the screen. The card layout was part of a weekly challenge they "issue." It was SC91 for those of you who frequent SCS. I finally used my Holiday Thyme designer series paper from SU!'s Holiday Mini catalog. I have such a hard time cutting into patterned paper! :) I really adore this new snowflake stamp set called The Snowflake Spot. It's such fun to use. Anyway, I hope that you are further inspired by this card to make your own Christmas cards! 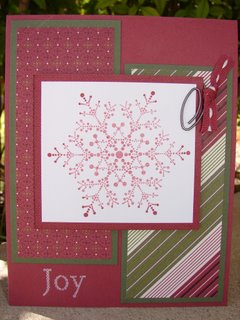
October 25, 2006
Single-Layer Cards
I've been trying my hand at some single-layer cards. I like the clean and crip style, and hope that you do too. Here's my most recent attempt, let me know what you think!
Congrats Rachel!
Good morning. I'm getting ready to take Emma to school, but thought I'd go ahead and do today's post. I made a simple card for my downline, Rachel. It was inspired (the colors) by some SU! ribbon that we have in our newest Idea Book and Catalog. I don't think I would have put them together on my own, but I think the card turned out okay. Rachel just got her first SU! recruit, and by having just one downline, it earned her a promotion to Supervisor. So, I'm giving her this card as congratulations. I haven't gotten to tell her about this blog, so the surprise won't be ruined. :) Enjoy, and have a great day!
October 24, 2006
Now I'm a Liar Too!
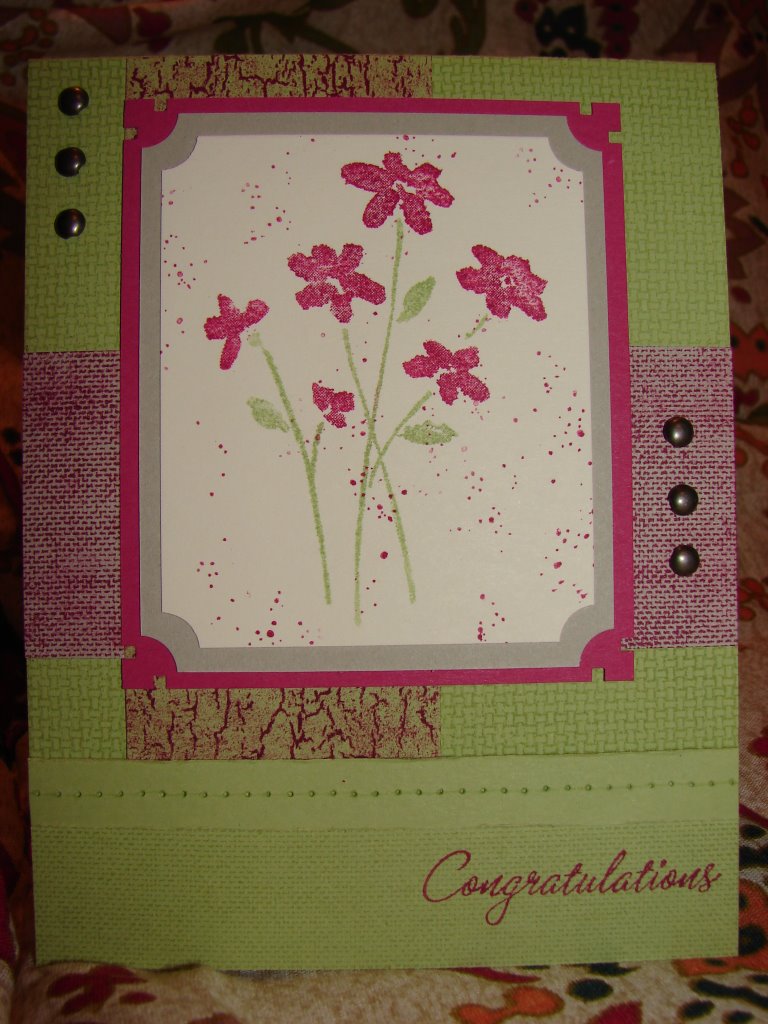
That's right, first I was a cheater, now I'm a liar! I was going to only work on projects for the Santa's Workshop looming ahead in my near future, but since Sunday I've been wanting to give a friend of mine a card. The only problem was that I had it pictured in my head, and still needed to make it! Hopefully you'll think it turned out okay. I'm not so sure about the ribbon I used since it's mostly hidden. I do like the colors though. They were inspired by the piece of ribbon. The colors used are Bravo Burgundy, Certainly Celery, Sahara Sand, and Very Vanilla. Thanks for looking!
 You can leave me comments at the end of each post. So far not many of you are and I would love to hear what you think! :)
I'm Cheating Already!
That's right. Neither of these cards were made today. I needed to save my little bit of free time for working on the projects I'm preparing for the Santa's Workshop Vendor Fair I'm doing in about a week amd a half. I've been hooked on browns lately, so hopefully you can handle some brown holiday cards.
 This City of David card was made for the last swap I was in. Some of you have it :) On the inside of this card is the Scripture from Luke 2:11, "FOR UNTO YOU IS BORN THIS DAY IN THE CITY OF DAVID A SAVIOUR, WHICH IS CHRIST THE LORD."
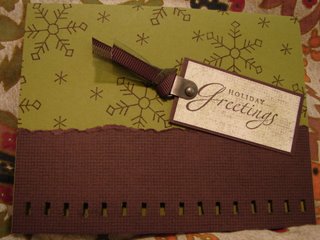 This snowflake card is for the Vendor Fair I'm going to at Sacred Heart on the 4th of November. Both were fairly easy to make but I think their simplicity adds to their charm. I hope you enjoy them both.
Having problems with even inking?
I myself have problems sometimes, especially with "bold" images, where the ink doesn't evenly cover the image I want to stamp. Well, I've heard lots of different ideas on how to fix this and came across the following information from a blog I came across:
Do your prints have blotchy spots? Fix it!!
A lot of people have problems when trying to stamp larger images, they end up with blotchy spots where the ink didn’t fully transfer. This can be VERY annoying, especially when you don’t know how to fix it.
Well, you’ll be very happy to hear that there is an easy fix for your problem. All you have to do is gently rub the rubber stamping surface with an ordinary eraser! Yes that’s it.
An ordinary pink eraser (or any type really) is all you need to soften and clean the stamping surface. This will allow the stamp to fully disperse the ink and eliminate those annoying blotchy spots.
You might find that your stamps are particularly old and the rubber has hardened considerably. In this case an eraser might not be enough to soften the rubber. When this happens you might want to try some fine grit sand paper, I suggest 120 grit or finer… a gentle rub is all you need to get those stamps like new again.
October 23, 2006
Getting Ready for Santa's Workshop
Today's post will have to be quick. We have family home evening tonight, so I'll be brief. I'm finally going to my first vendor fair, at the Sacred Heart church here in town. It's for home-based businesses, and I'm treating it like a Craft Fair. With the rules and regulations attached to being a SU! demonstrator, speaking in general terms I can't sell merchandise at an event like this, but I can sell hand-made items. These items are great as advertisement though for the things that are possible with SU! stamps and other products, and by themselves are rather neat. I hope to have lots of cards (Christmas, Thank You, Birthday, Thinking of You, etc.), Christmas Ornaments, some decorated journals, Post-It Note holders, beaded pens, and a decorated frame or two to mention a few. I'm really nervous so if you live around here and are free on November 4th from 9:00 a.m. to 2:00 p.m., come on down to Sacred Heart in town and visit my table. I would love to see you! Here's a picture of some of the beaded pens I'm making to accompany small composition notebooks and post-it note holders. They're very easy to make as Michele and Cherie learned today, and I would be happy to show you too! 
October 21, 2006
Zeke's Baby Book
I will try my best to post at least one "crafty" thing a day. We'll see how that goes....
For today, I'm posting the baby book that I made out of one of SU!'s On Board Art Journals. They are sold for $8.95 on page 215 of our Idea Book and Catalog, but I actually earned this one free as an incentive they offer based on my amount of sales. Anyway, on to the project:
I first used some of our On Board Accents (chipboard) which I covered with modpodge and patterned paper. I used SU!'s Double Sided Designer Series Paper called Spring Showers. The star, the circle, and the little tag are the items I'm speaking of. I sanded the edges of the paper which is why it's white around the edges. The little frame for the word cherish is part of our On Board Accents. I covered it in So Saffron Craft Ink. I made my holes for the spiral binding the hard way, so in a perfect world I will tell you how I would have done it had my brain been turned on. Pretend this is how it happened: I traced the holes in the edge of the patterned paper where the spirals needed to fit by un-bending the spiral coil and slipping off the cover. After tracing the holes on the back side of my patterned paper, I cut them out with SU!'s 1/4-inch square punch. Then, I painted the cover of the journal with modpodge using a sponge brush. I then adhered the patterned paper to the journal cover. Next I used sticky tape to adhere the twill tape with the little metal embellishment on it. After that, I used large glue dots to adhere the patterned paper-covered chipboard shapes to the journal. For the So Saffron colored frame, I used the sticky tape to adhere it with brads attached to it, to the journal cover around the word cherish. Lastly, I stamped Zeke on the journal. Here is the final product (the outside).

I didn't take any pictures of the inside, but I made little patterned paper tabs for the journal. There is one for each month and they're labeled "first month, second month, third month" and so on, all the way up to the 12th month. I put a piece of patterned paper on the first page of each month's section for a photo to be mounted there. There is also some space for journaling about the photo. In the very front of the book on the back of the cover I mounted Card Stock with "Baby Firsts" on it. Each baby first was listed with a blank for the age that the "first" was accomplished. For example, I had "I first clapped when I was _______ old," and "My first tooth came in when I was ____ old," and "I took my first step when I was _____old," and so on. On the very first actual page of the journal, I stamped some little footprints and "I'm Here" and printed out spots for the birth information to be recorded. For example: name, date, weight, height, and birthplace.
All in all, it was a very time intensive project, even though I think it looks easy, and I loved doing it. Handmade gifts at baby showers are something I love to give. I think Jodi (the mom to be) liked it, and I hope it will provide useful as she records special memories of Zeke.
I got my inspiration for this journal from a fellow SCS'er (splitcoaststampers.com member) whose screen name is atomicbutterfly. Take a peek at what Kelly made here .
Take care, and I hope to post something pretty on Monday. Sunday is my down-day so don't expect new stuff then. Thanks for reading!
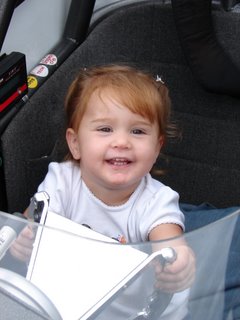
The cutest girls in the world!
We went camping last week at a Boy Scout campsite in Texas near San Angelo. It was a great time. We went because Peter is involved with Scouts, even though we don't have boys, and they asked him to be the "Chair" at this Cub Scout campout. It was a very nice camp - there was a river running through it, and the girls loved to listen to the crickets "singing" to us at night as Emma called it. Following are a couple of pics of them being cute.

I can hug nicely too


We got to go out on paddle boats while we were there, here are some pictures of that.
Mommy with Emma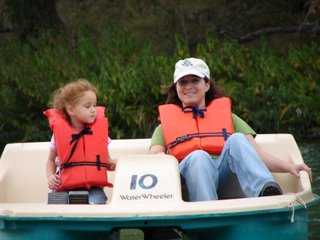
Peter with Sarah
For your viewing enjoyment, here's a (really bad) Family Picture
They had a race car there of some kind (not something I know much about) and the girls got to sit in it
It will be about 14 more years before we really have to worry about the fact that Sarah REALLY likes to drive!
October 20, 2006
Just a Note
I hope you all realize that I have never done anything like this before - from a technical standpoint. I'm basically figuring out how a blog works through trial and error, so please bear with me as I try to "populate" it and fill things in with information. Thanks!!
What am I doing?
This card was more complicated to make than it looks. First, I had to create a stencil for the "windows" that the penguins are peeking out of. I used my 1 3/4" square punch to do this. After the stencil was done, I used a sponge dauber to fill in the windows with a pastel in the color Tempting Turquoise. Next, I used post-it notes to mask the edges of the windows and I stamped the penguins. I used my pastel eraser to erase the color out of the penguin's white parts. Lastly I used my fun new stamp set Happy Everything to create the holidy greeting at the bottom of the card. Well, I should go now. I'll write some about my little cutie pies in my next post. We'll see how often I can get on here to blog/blab. Take care!
Well, I don't even know if I'll tell my mom I'm starting a blog. She thinks they're crazy, but she also still doesn't know how to do much more than turn a computer on - not much love for technology on her part :) I still love ya though Mom, and you can keep calling me when you need help with making your computer cooperate!
I guess the blog bug bit me, and I thought it would be fun to post things and see what my friends think. It will be an easy way to let people know what I'm up to, without having to spend a lot of time doing it.
Perhaps no one will even look at this, but if they do they will find that it's full of updates on my girls, but also updates on my newest passion - stamping. Yes, that's right. I clearly remember making fun of my scrapbooking friends while I attended the Air Force Academy, but now I do it too! I do it better though - I use STAMPS!!
I love my new hobby - so much so that I signed up to be an Independent Stampin' UP! (SU!) demonstrator. So, not only do I love doing the stuff but I love sharing how I do it with others. I have always been fond of giving people gifts, or surprising them with little things that remind me of them, or let them know I'm thinking about them. Well, this is the perfect way for me to really put some thought into their gift, along with making it really personal.
But - enough about that. I'm not the most open book out there - so you won't get a lot of mush out of me, but hopefully what I say here will interest at least someone - even if that's only me! :)
Here's a picture of my very first card that I submitted to SU! for a contest. I submitted it under the "Ho Ho Holidays" category that they had for the month of October. I'll find out about the middle of November who won. It's a very simple card, but it's the first one that I've EVER made that didn't involve at least two layers on the card. It was fun keeping it to one layer and "clean" looking. I hope that you like it. I do love those arctic animals - especially penguins! Did you know that seals eat penguins?!?!? I didn't. Anyway, here's my card: