Here's the little ornament that I posted earlier today. I had a lengthy explanation about it - that I gave it to my sister, and how I made it, but I will forgo that since I just want to get it posted again and hopefully you will "see" it. I'm sure you'd rather not read my normal essay anyway! ;) he he he Let me know if you get this e-mailed to you via your preferred subscription method. I would appreciate it!!
ETA: Below the picture are step-by-step (lengthy) instructions. I love to talk - would you expect anything else!!! :) 
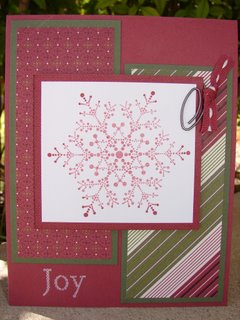
Stamps: Merry & Bright
Ink: Black StazOn, SU! markers
Accessories: heat tool, Sticky Strip (to adhere ribbon), red gingham ribbon, 2-way Glue Pen (to adhere glitter), Dazzling Diamonds glitter, Krylon acrylic sealantThe ornament is fairly easy to make. Here's what I did:
1. Stamp image in black StazOn on Domino. You could use other colors of StazOn, but I have never tried stamping in any other ink other than that so I don't know how it would do - if it would bleed, be permanent, etc.
2. Heat set the image with your heat tool. I usually do this for about 30-60 sec. depending on how large the stamped area is. Allow it to cool.
3. Using Krylon clear acrylic sealant, spray a VERY fine layer onto the domino in a well-ventilated area. I typically do this outside on a piece of newspaper. I hold the spray at least 30 inches away from the domino to ensure that it is a fine spray. I usually test spray in the air to ensure that the nozzle is spraying a fine mist and not any large droplets. If it is, you simply need to spray it some to remove any clogs. Also, a good rule of thumb is to turn the can completely upside-down and spray until nothing comes out when you are done using it so that it is stored with no paint in the tube.
4. Allow thin layer of Krylon to dry about 5 min and then spray one more thin layer on it. You should be able to see a different sheen to the domino where the Krylon has "landed" so if your coverage isn't very good, you can spray one more layer.
5. Using your heat tool re-heat the domino for another 30 seconds to ensure that they Krylon is dry.
6. Color in any parts of your image that you want using the fine tip end of your Stampin' Up! markers. I've never tried any others, but would assume they should work - even a Sharpie should work and might even bleed less.
7. Immediately after coloring part of the image in one color, heat the colored part for 20-30 seconds with your heat tool and then take a Kleenex and very carefully lay it over the image and press your finger down without any side-to-side movement to remove any excess ink. I do this until pressing does not remove any ink. If I'm not satisfied with what the image looks like after doing so, I touch it up. Do this with all remaining coloring to be done.
8. After last of coloring is done, heat the domino for 20-30 seconds again for a final heat set and then you will spray it again with your Krylon acrylic sealant in the same method as listed above, for 2 coats - 3 if needed.
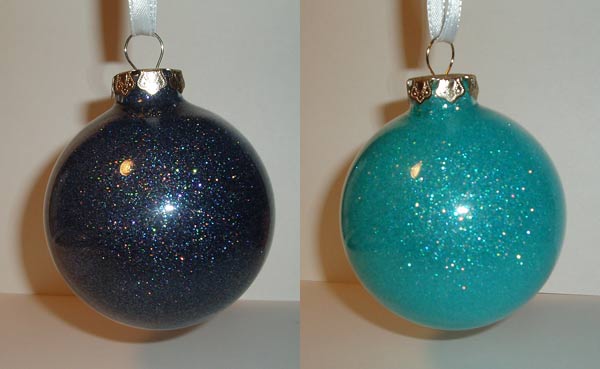
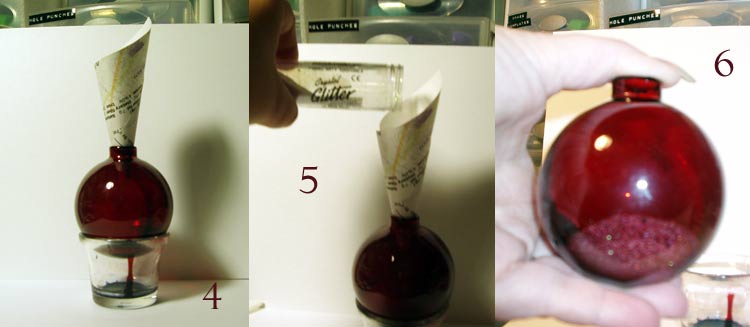
9. Apply 2-way Glue pen to parts that you want glitter and immediately dip in your Dazzling Diamonds glitter.
10. Put strips of sticky strip that are 1" long around each of the 4 corners. I find it unnecessary to wrap the entire outer edge of the domino in Sticky Strip. Wrap your desired ribbon around the whole domino tying the loose ends in a bow at the top.
11. Slip ornament hook beneath knot of bow to hang on your tree.
That's it!! Hopefully the steps make sense. I tried to explain everything I could think of as if you had never done any stamping like this before. If you're familiar with stamping on tiles or some other such surface you may want to do what you're familiar with. As you make these you may also find better ways of doing things, or ways that suit you better. Do what works for you! Happy stamping, and I would love to see what you create!!!


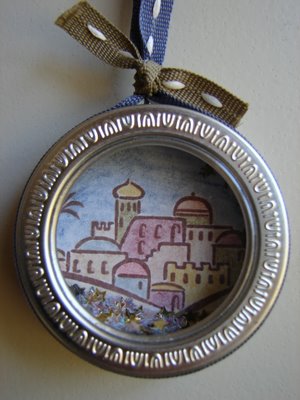 Well, this is what I've been working on on and off since Wednesday. It's finally done! I had to make 22 of them. For those of you who have actually been reading my blog since its inception, you will recognize this little ornament. I made a few minor changes (no embossing, more star glitter, different ribbon and ribbon attachment) but I still like this one just as much as the first. I hope you enjoy it! These are the large Maya Road Journey Tins that can be found at the Frantic Stamper website here:
