September 1, 2009
It's HERE.
Just click on the picture to download and view the BRAND NEW Holiday Mini Catalog or find it located in my right side-bar when you come back and visit in the future.
Enjoy. Contact me to order. Have it shipped straight to your door by clicking on the "Order SU! Online" button to the right.
December 30, 2008
Let's see if you can see this one...
ETA: Below the picture are step-by-step (lengthy) instructions. I love to talk - would you expect anything else!!! :)
Stamps: Merry & Bright
Ink: Black StazOn, SU! markers
Accessories: heat tool, Sticky Strip (to adhere ribbon), red gingham ribbon, 2-way Glue Pen (to adhere glitter), Dazzling Diamonds glitter, Krylon acrylic sealant
The ornament is fairly easy to make. Here's what I did:
1. Stamp image in black StazOn on Domino. You could use other colors of StazOn, but I have never tried stamping in any other ink other than that so I don't know how it would do - if it would bleed, be permanent, etc.
2. Heat set the image with your heat tool. I usually do this for about 30-60 sec. depending on how large the stamped area is. Allow it to cool.
3. Using Krylon clear acrylic sealant, spray a VERY fine layer onto the domino in a well-ventilated area. I typically do this outside on a piece of newspaper. I hold the spray at least 30 inches away from the domino to ensure that it is a fine spray. I usually test spray in the air to ensure that the nozzle is spraying a fine mist and not any large droplets. If it is, you simply need to spray it some to remove any clogs. Also, a good rule of thumb is to turn the can completely upside-down and spray until nothing comes out when you are done using it so that it is stored with no paint in the tube.
4. Allow thin layer of Krylon to dry about 5 min and then spray one more thin layer on it. You should be able to see a different sheen to the domino where the Krylon has "landed" so if your coverage isn't very good, you can spray one more layer.
5. Using your heat tool re-heat the domino for another 30 seconds to ensure that they Krylon is dry.
6. Color in any parts of your image that you want using the fine tip end of your Stampin' Up! markers. I've never tried any others, but would assume they should work - even a Sharpie should work and might even bleed less.
7. Immediately after coloring part of the image in one color, heat the colored part for 20-30 seconds with your heat tool and then take a Kleenex and very carefully lay it over the image and press your finger down without any side-to-side movement to remove any excess ink. I do this until pressing does not remove any ink. If I'm not satisfied with what the image looks like after doing so, I touch it up. Do this with all remaining coloring to be done.
8. After last of coloring is done, heat the domino for 20-30 seconds again for a final heat set and then you will spray it again with your Krylon acrylic sealant in the same method as listed above, for 2 coats - 3 if needed.
9. Apply 2-way Glue pen to parts that you want glitter and immediately dip in your Dazzling Diamonds glitter.
10. Put strips of sticky strip that are 1" long around each of the 4 corners. I find it unnecessary to wrap the entire outer edge of the domino in Sticky Strip. Wrap your desired ribbon around the whole domino tying the loose ends in a bow at the top.
11. Slip ornament hook beneath knot of bow to hang on your tree.
That's it!! Hopefully the steps make sense. I tried to explain everything I could think of as if you had never done any stamping like this before. If you're familiar with stamping on tiles or some other such surface you may want to do what you're familiar with. As you make these you may also find better ways of doing things, or ways that suit you better. Do what works for you! Happy stamping, and I would love to see what you create!!!
November 3, 2008
Ornament using GBC kit
This ornament uses my Big Shot, Circle 3-D Ornament Bigz die, some papers from the Go. Be Creative. November kit (Green Tea and Ginger) that you can see HERE, some ribbon (Riding Hood Red Taffeta), some buttons from the GBC kit, some white crochet thread, and some glue and glue dots to adhere everything together. I thought it was funny - okay, sometimes little things make me smile, that my oval-shaped ornament is made up of circles (the pieces of paper) and triangles (the shapes that the circles are scored and folded into). He he he....or not, I guess if you don't think it's kind of ironic. Hope you like it!!
As for tomorrow, I will post in the evening my CBC02 card. Hopefully some of you will play along!!!! I feel kind of lonely in the challenge right now. Check out the challenge and the GORGEOUS wedding cake that is the inspiration piece. The reason for posting later, is so that you, I and everyone, can
VOTE!!!!!!!!
PS - Having to use my hubby's computer so I can't edit my photos at all. Sorry for the photo tent background!!!
September 20, 2008
Have you seen these yet?
I'm not sure if you've seen any of the ornaments from this FUN kit that SU! has in the upcoming Holiday Mini Catalog, but they are SO FUN!!! You can customize the size of your ornament depending on how big you want it. For this ornament, I used 8 circles. You could use just 4, on up to whatever even number your little stampin' heart desires!!! I love the patternedpaper used for this kit - it's SO pretty and perfect for the Christmas tree. The best part is that you can make over SIXTY FIVE ornaments with this kit, and it's only $19.95. That's a great deal!! Also, you can obviously make these without the kit - simply punch a bunch of circles and score them, but these circles come pre-scored so you don't have to figure out how to get an even triangle scored onto your circle to fold the three sides!!! I know I wouldn't want to do that - especially to make a lot of them!!! So, add it to your wish-list of items from the Holiday Mini Catalog that you've seen in sneak peeks around the stamping world!!!
PS - the ornaments are pretty easy to put together, but you may want to play with the pieces before you permanently adhere them. Some people have a harder time conceptualizing the geometry behind the circles, but by no means is it difficult or impossible!!!
January 15, 2008
Christmas Items - Third Post
These were the only 3D items I made this year. The first picture is of an ornament made from the left-over tins from this project. The second is one of those Tootsie Roll banks that Wal-Mart has/had around Christmas-time. I used them for a Stamp Club project and also had this one to give to a friend as a gift. For the Tootsie Roll bank I used the Scratch n' Sniff embossing method that SU! shared with its demonstrators in a past issue of Stampin' Success and it DID NOT work well. I don't recommend it with unsweetened pudding. I think if you use Crystal Light, or maybe even sugar-free Jell-O it might work better. The pudding granules were too clumpy and didn't make for good embossing. You can see in the picture what I mean.
October 13, 2007
Scallop Circle Punch Ornament
This is not an original idea of mine, and I can't remember which blog I saw it on to save my life (please let me know if it was your blog and I'll edit this post to give credit where it is due), but I loved the idea of a simple ornament that you can make for teachers or friends, or even YOURSELF (can we do that - make things for OURSELVES?!?!?) to hang on the tree. It was SO EASY to make and I think it's adorable. I only punched five scalloped circles but you could add more or even use only four - it all depends on what you want to do. It's a great little project and with the upcoming Designer Series Paper special (buy 3 and get your fourth FREE!! but wait until November 1st to contact me to order some - when the special begins) it's just perfect for the holidays! Hopefully the different views of the ornament will help you see how it's made. I just glued each scallop to the next. You fold them each in half and glue just one side to the next scallop. Before I glued the last scallop on I put my cord in there with a little bit of glue and then added the last scallop. SU!'s elastic cord will make a nice loop for the ornaments. We'll be making these as a little bonus project at my upcoming workshops and Stamp Club. Enjoy!
December 14, 2006
Emma and Sarah's Ornaments
December 13, 2006
My projects and the girls see Santa arrive
The following projects are the things I've been working on since returning home from Thanksgiving. I am so sick of typing in recipes for the cookbook I'm compiling that I decided to take a break, take some pictures, and FINALLY update my blog. Here ya go:
This last group of pictures is the girls and our whole family waiting for Santa to arrive at the base. We went to the Christmas Tree lighting and then had dinner at the Officer's Club afterwards. The girls were not interested in the camera at all, so the pics aren't that great. I also was not (as usual) in a photogenic mood, but it's not that awful of a picture of me, I guess :) The last picture is the worst picture with Santa in the history of the planet - okay maybe not THAT bad - Sarah was terrified of him, and you can see Peter's arm trying to hold her there for the picture. Even Santa took a bad picture - he didn't look at the camera!!! We'll probably try to go see Santa at our teeny tiny mall sometime this week or next. Maybe we'll have better luck there!


November 20, 2006
I will be out of town for a while....
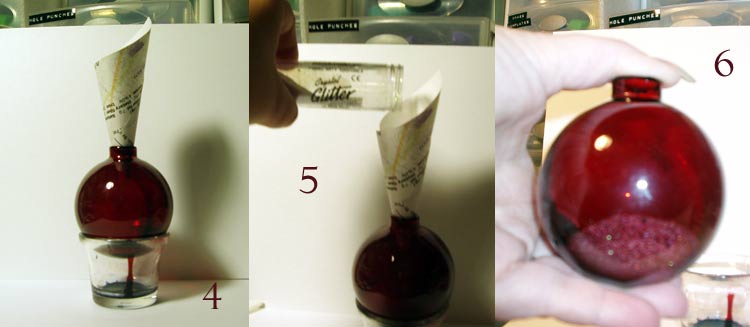
We get to go visit my husband's family in Mesa, AZ after all and I'm so excited! I'm excited partly for all of the shopping I can do there - they have real stores like Jo-Ann's, Michael's, Hobby Lobby, TARGET, etc.!!!!!! Mostly I'm excited because we get to see some family that we haven't seen in a while and my sister-in-law is going to make the trip as well with her family. They weren't going to at first, and then her husband surprised her with getting vacation time so that they could go. Anyway, happy Thanksgiving to all of you. I hope that you're able to take the time to enjoy all of the blessings you have, and can perhaps take the time to help someone else during this holiday season who is less fortunate. I won't be posting until around the 4th of December. I thought I would share a tutorial I found by Laura on her blog, which I view regularly (http://inkydinkydo.blogspot.com), that I think will be really helpful for those of you who want a gorgeous but easy Christmas gift to make. They're glitter ornaments, and her tutorial is outstanding. I've seen several, but she really takes the time to show you how to do it with pictures at each step, not just words. Enjoy, view her blog and tell her thanks, and take care everyone!!!

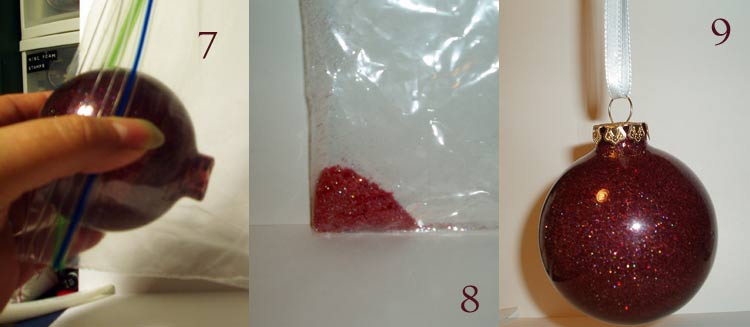
Ok here goes, my very first tutorial. I've never written one of these before, but I had so much fun making these ornaments, that I thought everyone should know how! The 1st one is Night of Navy and the 2nd one is Cool Caribbean. I also made one with Marigold Morning, but the picture made it look orange and not very pretty, but it's gorgeous IRL!

 Now you want to have a plastic baggie ready to catch the excess glitter. This is the bonus of this technique. You now have custom colored glitter you can use on other projects! (see pics 7 & 8) Let the ornament dry for a few minutes and replace the metal hanger. Your custom glitter ornament is done! These are so much fun and SO easy to make!
November 18, 2006
Christmas Gift Swap
 Well, this is what I've been working on on and off since Wednesday. It's finally done! I had to make 22 of them. For those of you who have actually been reading my blog since its inception, you will recognize this little ornament. I made a few minor changes (no embossing, more star glitter, different ribbon and ribbon attachment) but I still like this one just as much as the first. I hope you enjoy it! These are the large Maya Road Journey Tins that can be found at the Frantic Stamper website here: http://www.franticstamper.com/maya-emb.htm I used Stacy's CM circle cutting system and there was a circle in it that fit PERFECTLY! Thanks Stacy for saving me hours of cutting circles!!!! Enjoy!
November 14, 2006
Make It, Bake It, Grow It
 The ladies in my husband's squadron (where he works) are having our annual Make It, Bake It, Grow It auction to raise money for the squadron. Last year I had just decided to soon become a demonstrator and donated 10 cards that sold for $25. Not to bad, but not that great either. This year I've made a gift basket that contains 8 Holiday cards/envelopes, a beaded pen, a post-it note holder, a refrigerator calendar, a domino ornament, and a mini composition book. The colors were inspired by the tin that they will come in (behind all of the objects in the picture). It has a color close to Pink Passion, one that's pretty much Certainly Celery, and another that is super close to Garden Green. So, using this color theme (ignoring the odd-colored blue snowflakes) I created these projects. I didn't want the composition book, pen, calendar, or post-it note holder to be themed to Christmas so that someone would feel weird using them in July, for instance. The cards and ornament though, I was able to tie the penguins in with the colors used by using the little penguin from the Wild About You stamp set. I love that little guy! Anyway, I hope you like it, and I hope it earns lots of money for the squadron!!!
October 27, 2006
It's not even Thanksgiving Yet!
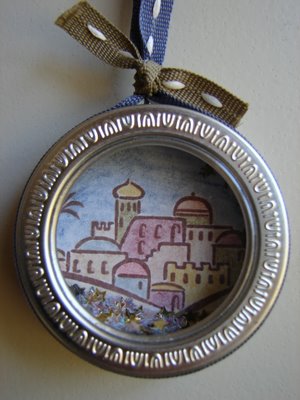
Well, Thanksgiving is still weeks away, but here I am working away at Christmas cards and other items. Some of them are for my upcoming craft show. Others are for swaps or just to have as examples at workshops. Since I skipped yesterday, I'll post 2 pictures of what I've been working on. I claim about zero originality on the ornament that you'll see here. I got the idea for it from Debbie Olson's blog Thinking Inking . I changed up the colors a bit, tied the ribbon differently, and used some little glitter stars inside instead of microbeads. I also embossed the image in ultra fine gold e.p. I thought that her use of the City of David stamp set for the stamped image was perfect. I absolutely love this set! This ornament I am going to have to make 24 of - for a Christmas Gift Swap that I'm part of with other SU! demonstrators in my up/sideline. I hope you like it! 
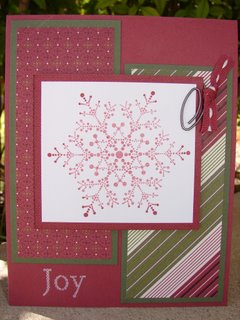
The card you see below is one that I made after getting the idea from SCS (SplitCoastStampers). To get to SCS, click on the link you see above on the right-hand side of the screen. The card layout was part of a weekly challenge they "issue." It was SC91 for those of you who frequent SCS. I finally used my Holiday Thyme designer series paper from SU!'s Holiday Mini catalog. I have such a hard time cutting into patterned paper! :) I really adore this new snowflake stamp set called The Snowflake Spot. It's such fun to use. Anyway, I hope that you are further inspired by this card to make your own Christmas cards! 


