***Please note that after switching from several different hosts before settling on Blogger, the formatting of my pictures may not be as it was originally intended. I simply don't have the time to go back through years of posts in order to fix the orientation of the pictures. Sometimes a picture just shows a box of text in its place, but clicking on it will allow you to see the picture. Others, there may be no picture at all. I apologize.***

December 24, 2006

Merry Christmas!


Well, no projects to post, but I felt like saying Merry Christmas to everyone that visits my blog. I'm so excited for tomorrow, I LOVE giving presents and I think I got my husband a pretty good one that he wouldn't have expected, and I think the girls will like what they get. Most of their presents are from my parents, but Santa and Mommy and Daddy should score pretty well with them too :) I'm so thankful that we have been blessed such as we have to be able to provide gifts to our girls, and our friends and family. We have such wonderful family and friends, and we're so thankful for them. I hope that each of you is able to enjoy time this season with those that you love and care about. I also hope that each of us can really take our Saviour's example to heart and help those less fortunate, or those that just need a little lift in their day. Even the small gestures of kindness, compliments to others, or a helping hand can make a world of difference in the day of someone else. I am so thankful for my Savior, and the knowledge that I have of Him. I hope that the Spirit will touch each of you this season, and whether you believe in Him or not, we can all strive to be better people and to help others. That is how we can truly be happy. So, merry Christmas everyone!! I hope to post before the new year, but take care until then.

December 21, 2006

I'm Famous!

Well, kinda, sort of, not really, but maybe just a little! :) I sent in two cards to Stampin' Up!'s October contest under a "Ho, Ho, Holidays" theme, and while they didn't win, one (at least so far) made it onto Stamper's Showcase where they display some of the cards that are sent in to them. It sure made my day start off great! Here's what they displayed:

LOVELY AS A TREE STAMP SET (101223)

Stamps:
WARM WORDS STAMP SET
Paper:
CARD STOCK CRANBERRY CRISP 8 1/2X11
CARD STOCK TRUE THYME 8 1/2X11
CARD STOCK VERY VANILLA 8 1/2X11
CARD STOCK GLOSSY WHITE 8 1/2X11

Inks:
CLASSIC STAMPIN INK REFILL CRANBERRY CRISP
CLASSIC STAMPIN PAD CRANBERRY CRISP
CLASSIC STAMPIN INK REFILL TRUE THYME
CLASSIC STAMPIN PAD TRUE THYME
ENCORE INK REFILL GOLD
VERSAMARK PAD
Accessories:
STAMPING SPONGES
STAMPIN EMBOSS POWDER DETAIL GOLD
PUNCH HANDHELD 1/16 INCH CIRCLE
BRADS GOLD
RIBBON STITCHED GROSGRAIN CRANBERRY CRISP 1/4 INCH

Comments:
Marbeling technique was used to create background image for card.

I know it seems silly, but it sure is exciting to be featured!!!

As promised, here are the projects we made in our Micro Bead class. I had a wide variety of experience with any kind of stamping in my class, so I tried to show different ways to use the micro beads, but not get too complicated so that everyone would have fun and enjoy the class. I'll describe each project. The first is the beaded pen we made. I use sticky sheet that I purchase at Penny Wise Arts and SU! paper and micro beads. These are fun projects, they're quick and easy, and end up so pretty!


The next project was a simple little card that we made featuring the small cards available in SU!'s Winter Mini catalog. We used Crystal Effects to adhere the micro beads to the heart that they stamped on Very Vanilla.


The next card we made featured placing micro beads (or any beads for that matter) on sticky strip to create a nice border or "strip" with texture, dimension and shine. I've used this card layout before and really like it, so I changed it up a bit by adding the beads for this class.

The last card we made was, of course, a shaker card. If you're going to use micro beads, you have to know how to make a shaker card with them or any other object that will fit between a foam layer and make that fun shaking sound! Here is the one that they made:

The last projects I'll show you today are a few more of the ornaments I made. I really like the darker colors best because the ball isn't as transparent with them. To answer Jenn's question, I use Classic Ink re-inkers, and basically after I turn them upside down (onto my stamp pad - carefully balanced) to drain - I figure why waste it in a glass? - then I immediately put in the glitter. I don't think you need to wait too long between draining and putting the glitter in, or you might not have as much glitter stick if the ink had dried some. Hope that helps!!!


This last picture is the best! It's my cute-girl Emma the day of her Christmas presentation at the Methodist Day-School where she goes to school 2 days per week. It was ADORABLE! They sang two songs, and it was just so cute!


December 19, 2006

Shameless Request

Well, I have a class that I'm getting ready for tonight - it's a Micro Bead class. I'll post what they're making tomorrow (hopefully). While I don't have any pictures to post now, I do have one request. I enjoyed the comments that were left when I first started my blog, and have noticed that even as people have subscribed in recent days, no one has left any comments. Now, I know people are reading because of my counter, but EVERYBODY likes to hear what people think about their work, or even just what they say, and I'm no different - especially when it's GOOD!!! So, if you have a second, when you view my different posts I would love it if you would take a second to let me know what you think - even if it's an older post. Thanks so much, take care, and wish me luck with my class tonight!!!

December 18, 2006

What I did ALL DAY today....

I have several projects that I needed to finish today, so my poor little girls saw more t.v. today than they've seen all month!!! I finished up two baby journal/books for a friend that had asked me to make them for her. They are pictured first. I covered the front of one of SU!'s On Board Journals. I also covered the two chipboard flowers on the front. Inside on the cover is a sheet that has all kinds of baby "firsts" to fill in. The very first page has the baby's birth info. Then, depending on the number of tabs needed - I insert a piece of patterned paper at the beginning of each tab which also coordinates with each month for the baby's first year, or in the case of Madelyn's journal, since she's already two, her tabs say "2 years", "2 1/2 years", "3 years", "3 1/2 years" and so on, up to age 4 1/2 years. I printed out the tabs on the patterned paper on my computer and then used my Sizzix to die cut the little tabs. I love that die!!!!! Here they are- 2 views of each so that you can see the tabs a little. I sure hope that Nicole enjoys them and that her girls do too when they're older!!!


The next picture is of some ornaments I made to give to friends. I finally got around to using the tutorial I posted on here a little while ago on how to make glitter ornaments. Just FYI - it took me around 25 drops to get the color to adequately coat the inside of the ornament. 20 wouldn't cover it. They were pretty easy to make, are so pretty, and sparkle a lot more in real life.


These last two pictures are of the two cards I made (14 each of - it was a 12 + 1 swap and I wanted one for myself) for a swap I'm in on SplitCoastStampers hosted by SCS'er JoAnne (jreks). I sure hope that the other swappers like them!!! I used the upcoming Sell-A-Brations stamp set Happy Harmony. I really like the sayings that come with it. You may not be able to tell due to my picture quality, but the paper on the Ruby Red and Chocolate Chip card with the image stamped on it is actually Whisper White, not Very Vanilla. The saying in bottom right of that same card says "It's the little things that make life big." I was inspired for the colors of this card and the layout by Debbie. You can check out her card on her blog : Thinking Inking I changed it up a little bit, but I've always loved this color combo and haven't used it in a while. Something else you can't see is that the piece of Chocolate Chip CS that is pierced was stamped with the Canvas BG stamp too.


December 14, 2006

Shoebox Swap Card

Some of my friends who are demos in the area and I had the idea to do another shoebox swap with each other featuring the Winter Mini catalog items. Well, here's the card I made. I thought that featuring the new small tag punch and also the stamp set Tagger's Dozen would be fun. I made this card rather quickly, so it's not perfect. I got the chance to go to a friend's house when she was having a come-and-go scrap. I had several things to get done, and didn't bring my markers but I thought I could still make this card even though a few of the dots under the butterflies got inked when I tried to avoid them. I figured that the ladies in the shoebox swap, with the right tools (I would supply my markers) wouldn't have this problem and theirs would look perfect! Well, I ended up flaking out of going to the swap last night because I didn't want to spread my germs - that cold is still lingering - but almost everyone else had things come up too, and only 2 or 3 ladies of the original 7 made it to the swap. Hopefully next time hubbies will be home to watch kiddos and we'll all be well. Shoebox swaps are TONS of fun - you should try one!!! For those of you unfamiliar with them, what you do is instead of just making a bunch of cards yourself for a swap, you make one, and then bring everything needed for all the participants in the swap to make it themselves. Everything you need usually fits in a shoebox sized container, thus the name shoebox swap. Clear as mud? Well, I hope you like my card. I LOVE the new small punch that makes layering tags so easy! My husband cut out hundreds of tags for the little gift tag bags that I made for that craft fair in the beginning of December, and he sure would have liked to have had this punch then!!!! At least he helped me - even if it meant that much cutting!!!! So here's my suspended tag card. The little tag in the window spins around in a circle on the thread it's hanging on. These cards are fun to make, and not that hard either. Enjoy!


Emma and Sarah's Ornaments

I remember back in pre-school making an ornament out of some glue, toothpicks, paint and glitter. So, here's my attempt at re-creating that opportunity for my girls. They started with a pool of Elmer's glue on wax paper. They each did EVERYTHING themselves (I had to help Sarah squeeze the bottle hard enough, but I didn't direct its flow) and I'm so proud :) Next, they laid toothpics in the glue to resemble the rays of the sun, or as we call this ornament, like a star. We had to let it dry overnight. Then, with WASHABLE poster paint (it ended up everywhere!) they painted their stars, and chose from between the only two colors I had - green and red. Emma chose red and Sarah chose green. After painting, while the paint was still wet, they sprinkled (dumped in a pile in Sarah's case at first) glitter over the ornament. Again, we let it dry overnight, and tah-dah!!!! Here they are on the tree.


Emma's ornament:


Sarah's ornament (more amoeba-like than star-like) :

December 13, 2006

My projects and the girls see Santa arrive

The following projects are the things I've been working on since returning home from Thanksgiving. I am so sick of typing in recipes for the cookbook I'm compiling that I decided to take a break, take some pictures, and FINALLY update my blog. Here ya go:


This card is one that I was asked to make 18 of for my church. My church is giving some families Christmas baskets and asked me to make some cards for them. I thought I'd try a new layout for the Texas Snowman that I've done before. If I had had some more time, I would have pierced every scallop with my piercing tool and then outlined each hole left behind with my white Signo gel pen. I love that look! No time though....


The first picture is the front of the card, the 2nd is the inside. As you'll notice, I used my large oval punch to punch a hole in the front of the card to reveal the words Texas Snowman which were mounted on the inside with dimensionals to make them "pop" even more. I got the "Barbed Wire" font (used on "Texas Snowman") and the "Susie's Hand" font (used to say "Happy Holidays") off of a really cool website that has free fonts that my friend Anne told me about. It's kind of hard to see in the picture. Here's the website: http://www.momscorner4kids.com/fonts/index.htm It has tons of fonts and it's very user friendly.


This next group of pictures are the ornaments that I made for my mom to give to some friends. I sent her one as part of a present for her birthday in November and she asked if I could make her 10 more. The ones with the snowman under the tree were easy enough. I stamped them with black StazOn and then colored them in (constantly dabbing the excess ink from my markers off of the domino so that it didn't bleed) with my SU! markers. After I let them dry, I sprayed them with a clear acrylic sealant and then used my two-way glue pen to apply the glitter at the bottom. Lastly, I used sticky tape to adhere the ribbon. The other two - the snowman ornament and the tree ornament needed lots of masking done to get the images to fit. I didn't want to cut off the snow - the glitter adds a nice glimmer to the ornaments - so I had to mask the bottoms in order to put it back in the picture. The same process was done coloring these dominos as I mentioned above.


The next set of pictures are some candles that I made that were supposed to be gifts, until each and every last one of them (there are four - 2 of the smaller hunter green ones) got dropped on the floor by a curious little 2-year old. I guess they'll be staying here!!! Candles are a fun and easy project. You simply stamp on tissue paper and then wrap it around the candle. Cover it with wax paper and then using your embossing heat tool, you gradually melt the tissue paper into the candle. You have to be VERY CAREFUL not to overheat in one spot or it will warp the candle. You can tell when it's melted properly because the tissue paper turns transparent - the color of the candle - instead of looking white. Instead of re-creating the wheel, here's a tutorial from SplitCoastStampers that I used over a year ago to teach myself how to do it: Stamping on Candles Tutorial


I am by no means a gifted scrapbooker. I still like to try it out every now and then, and here are the pages I made of the girls for Halloween. Sarah will need another page showing her whole costume, and Emma's I'm just not that fond of but I already cut up the pictures and will just leave it as it is instead of cutting up more :)


This last group of pictures is the girls and our whole family waiting for Santa to arrive at the base. We went to the Christmas Tree lighting and then had dinner at the Officer's Club afterwards. The girls were not interested in the camera at all, so the pics aren't that great. I also was not (as usual) in a photogenic mood, but it's not that awful of a picture of me, I guess :) The last picture is the worst picture with Santa in the history of the planet - okay maybe not THAT bad - Sarah was terrified of him, and you can see Peter's arm trying to hold her there for the picture. Even Santa took a bad picture - he didn't look at the camera!!! We'll probably try to go see Santa at our teeny tiny mall sometime this week or next. Maybe we'll have better luck there!


AHHHH!!!!

I'm SO SORRY that I've been so negligent in my postings! I have been very sick since Thanksgiving. I guess since it's going out in our Christmas letters, I might as well mention here that I'm pregnant. Just barely - 9 weeks along - but enough to have the worst morning sickness I've ever experienced. I've been sick ALL DAY long. I'm hoping the next few weeks as I close in on the 2nd trimester will bring some relief. Add in a cold that my girls and I have, and you've got one miserable house!

I've been working on projects when I can. I have a swap that I'm in twice, a shoebox swap with local demos, 2 baby books to make out of SU!'s journals before the 19th, 10 ornaments to finally put the ribbon on for my mom, AND a COOKBOOK to finish typing for my church. I told the ladies they would have it before Christmas, and because some of them didn't turn in their recipes to me until just 10 days ago, when you combine that with how awful I've been feeling, and 2 sick little girls that have to be tended to, it makes for some SLOW going!

I feel a bit overwhelmed, but I work best under pressure so I know everything will get done. The cookbook has to be done by tomorrow so that I can call for a price estimate and then collect all of the money from the purchasers Friday before we leave Friday afternoon/evening for San Antonio to get them made at an OfficeMax or similar place. Anybody have any recommendations for where to get them printed? Only the cover is color, and I want them spiral bound (the plastic coil type). They're not going to be too terribly long. Probably 50 pages or less. Let me know if you have any ideas on "national" stores where this can be done (ie OfficeMax, Office Depot, Kinko's, etc.).

Thanks so much for bearing with me. As soon as I can, I'll get some pictures up of what I've been working on. Take care, and have fun getting ready for Christmas!!!!

November 20, 2006

I will be out of town for a while....

We get to go visit my husband's family in Mesa, AZ after all and I'm so excited! I'm excited partly for all of the shopping I can do there - they have real stores like Jo-Ann's, Michael's, Hobby Lobby, TARGET, etc.!!!!!! Mostly I'm excited because we get to see some family that we haven't seen in a while and my sister-in-law is going to make the trip as well with her family. They weren't going to at first, and then her husband surprised her with getting vacation time so that they could go. Anyway, happy Thanksgiving to all of you. I hope that you're able to take the time to enjoy all of the blessings you have, and can perhaps take the time to help someone else during this holiday season who is less fortunate. I won't be posting until around the 4th of December. I thought I would share a tutorial I found by Laura on her blog, which I view regularly (http://inkydinkydo.blogspot.com), that I think will be really helpful for those of you who want a gorgeous but easy Christmas gift to make. They're glitter ornaments, and her tutorial is outstanding. I've seen several, but she really takes the time to show you how to do it with pictures at each step, not just words. Enjoy, view her blog and tell her thanks, and take care everyone!!!


Laura's Tutorial:


Ok here goes, my very first tutorial. I've never written one of these before, but I had so much fun making these ornaments, that I thought everyone should know how! The 1st one is Night of Navy and the 2nd one is Cool Caribbean. I also made one with Marigold Morning, but the picture made it look orange and not very pretty, but it's gorgeous IRL!
First carefully take the metal hanger off your ornament. Then add about 20 drops of reinker. I used Cranberry Crisp for this tutorial. (see pic 1) Then you need to swirl the ink around inside the ornament until it coats the inside completely. (see pic 2) After you have the entire inside coated, turn the ornament upside down so that it can drain into something. (see pic 3)
Ok now you need to use some sort of funnel to add the glitter. I just made one from scrap copy paper. (see pic 4) Add about 1 1/2 teaspoon of ultra fine glitter to the ornament. (see pic 5) Now here comes the fun part! Take your thumb and COMPLETELY cover the opening. (I have tiny hands and I can do this, so you should be able to as well.) (see pic 6) Now SHAKE the ornament. Shake it hard, but be careful not to hit it on anything. You want to shake it and not roll the glitter around inside, rolling it will create lines in the glitter, while shaking it will give a smoother look.
Now you want to have a plastic baggie ready to catch the excess glitter. This is the bonus of this technique. You now have custom colored glitter you can use on other projects! (see pics 7 & 8) Let the ornament dry for a few minutes and replace the metal hanger. Your custom glitter ornament is done! These are so much fun and SO easy to make!

November 18, 2006

Christmas Gift Swap

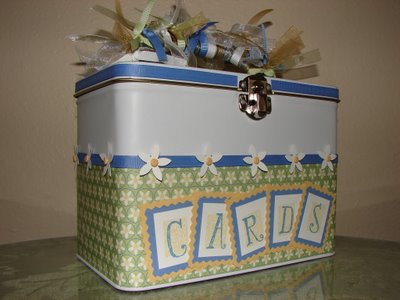
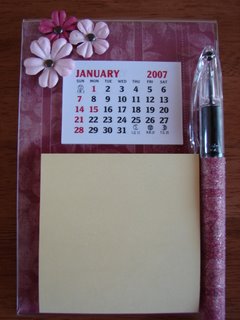
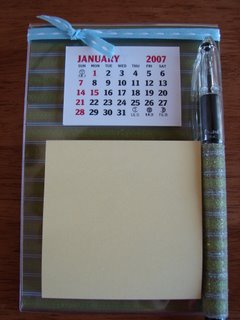
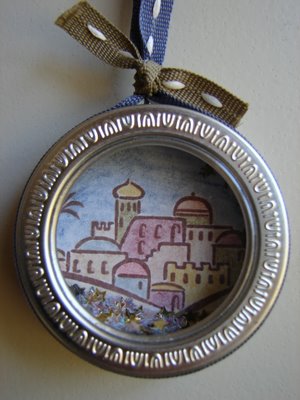
Well, this is what I've been working on on and off since Wednesday. It's finally done! I had to make 22 of them. For those of you who have actually been reading my blog since its inception, you will recognize this little ornament. I made a few minor changes (no embossing, more star glitter, different ribbon and ribbon attachment) but I still like this one just as much as the first. I hope you enjoy it! These are the large Maya Road Journey Tins that can be found at the Frantic Stamper website here: http://www.franticstamper.com/maya-emb.htm I used Stacy's CM circle cutting system and there was a circle in it that fit PERFECTLY! Thanks Stacy for saving me hours of cutting circles!!!! Enjoy!

November 16, 2006

HAPPY BIRTHDAY MOM!!!

It's my mom's birthday today, so I wanted to take a minute to say happy birthday to her. She has definitely been the most inspirational woman in my life. I can see a little of her in me from time to time, and it's always when I feel like I'm being a positive influence on the world, or on someone else. She is always more concerned about others than she is about herself. She is a teacher, and loves to learn about everything. Her students always love her because she wants them to be genuine, and she teaches us to love ourselves for who we are and that we don't need to fit some mold and be someone we're not. I only hope to be able to love others as she does. So, happy birthday Mom, you deserve it!!!!!

I wanted to update my readers. I've been super busy this week with something to do/somewhere to be each night. My husband goes on a short weekend TDY this Friday (which oh so conveniently takes him straight to where his brother is getting married, so the trip to the wedding is on the AF! Congrats Doug and Heather!!!), so I'll be too busy tring to watch the girls and finish up some gifts/cards for swaps I'm in that got HUGE (16+ people in BOTH!) to post anything probably until Monday. We have friends coming to dinner Sunday that are going to be moving soon (I'm sad - I will miss them!) and then Tuesday we drive to Mesa for Thanksgiving and won't get back until the 1st. So - you won't be hearing from me for a while. I will do my best to post my swap items on here before I go so that at least at the top of the screen is a stamped item - not words from me blabbing.

Take care, and make it a great day!

November 14, 2006

Make It, Bake It, Grow It

The ladies in my husband's squadron (where he works) are having our annual Make It, Bake It, Grow It auction to raise money for the squadron. Last year I had just decided to soon become a demonstrator and donated 10 cards that sold for $25. Not to bad, but not that great either. This year I've made a gift basket that contains 8 Holiday cards/envelopes, a beaded pen, a post-it note holder, a refrigerator calendar, a domino ornament, and a mini composition book. The colors were inspired by the tin that they will come in (behind all of the objects in the picture). It has a color close to Pink Passion, one that's pretty much Certainly Celery, and another that is super close to Garden Green. So, using this color theme (ignoring the odd-colored blue snowflakes) I created these projects. I didn't want the composition book, pen, calendar, or post-it note holder to be themed to Christmas so that someone would feel weird using them in July, for instance. The cards and ornament though, I was able to tie the penguins in with the colors used by using the little penguin from the Wild About You stamp set. I love that little guy! Anyway, I hope you like it, and I hope it earns lots of money for the squadron!!!

November 11, 2006

Faux Postage

Thanks for bearing with me. I've been taking a break from stamping after the stamping frenzy I went through in preparation for that craft fair that I recently participated in. Today I'm going to spotlight a technique that I tried for the very first time called faux postage. It's really fun and easy to do. I made these cards for the craft fair, so some of you that visited my table might have seen them already. Here's the link to the tutorial that I followed to make my cards so that you can make them on your own. It's easy to follow and has pictures and step-by-step instructions. It is from splitcoaststampers.com: http://www.splitcoaststampers.com/resources/fauxpostage.php

This technique is really fun, and I look forward to playing around with it some more. My cards were made with the intent in mind to make it non-traditional Christmas colors. I used Almost Amethyst and Lovely Lilac which I really like the monotone look of. To jazz it up a little, if you can see the words, I stamped Merry & Bright and put dazzling diamonds glitter all over it. I used my large oval punch to make the little window for the words. I can't wait for next week though, because I finally ordered the small oval punch and once it comes I will be able to do all sorts of fun things with it and by combining the use of it with the large oval punch. Anyway, here's my card, and thanks so much for looking!!!

November 7, 2006

Dove Evolution

This is the strangest thing to watch, and then realize that we see it every day and don't realize it. Just take a look at the pictures you see around you in magazines, on billboards, on tv....

Tags, tags, and more tags!

Those of you who are loyal SU! stampers probably know that SU! is going to have a new tag punch in the upcoming (Dec 1st) Winter Mini Catalog. It is smaller than the current punch, so it makes layering so easy that even my daughter Emma could do it! Well, here is a technique that I learned of long ago, but found a nice summary of it in Amy Ryasvy's blog (Prairie Paper & Ink) on how to make the tags longer than the punched shape you would get otherwise. You can take this method and apply it to the new smaller tag (once we all know how wide it is!) and you can have tags of any size! Thanks Amy, and like she says, I hop this helps someone! Enjoy!

From Amy's blog:

"Extending" Your Tag Punch
Did you know you can make longer tags w/ your tag punch?? I remember being told I could do this back when the punch was first released but I didn't get *how* till I actually saw it.
So for some of you this is old news but hopefully this will be the "Aha!!!" moment for *someone*!! LOL
Basically all you do is cut a strip of CS several inches long and (for this particular punch) 1 3/8" wide (the width will vary if you're using different punches).
Then all you do is pull the CS through the punch like so:
So then all you're really punching is the top portion - that way you get tags in any length you desire!!
Cool eh??

So there on the right you can see a tag just punched w/ the Tag Punch (far right) and one that I pulled through and made longer.
So there's a *super* simple way to get more use out of your Tag Punch! I HTH someone!! :o)

November 6, 2006

It's Over!

Finally, the craft fair is behind me. I did well. I figured that here in Del Rio, if I could MAKE money, I would be happy with the result. Well, I did. I learned a lot though in the process. Here, I can't sell anything for over $10 so if it's worth that, then it's not worth my time making it because it won't sell. I guess people here aren't into hand-made items that are NICE. They bought all of my cutesy stuff that was inexpensive, but the nice things I had for sale like lunchbox tins (card organizers), "name" frames that they could custom order, and even candles didn't sell at all. I didn't sell ANY bundles of cards. I had my cards priced $2.50 each which is on the cheap side for a hand-made card, or 6 for $10 and I only sold them as onsie-twosies. Oh well, now I don't have to make ANY of the 50 or so Christmas cards I was going to have to make. Post-it note holders with beaded pens, and domino ornaments and refrigerator magnets, along with refrigerator calendars sold the best. But they were only as much as $6.00 and the magnets were only $1.00. I think I'll do this again next year, but now I know what to expect. I'm glad that I didn't go in with high expectations. I did think cards would sell better, but one lady commented to me that they just e-mail people now. How silly!!!!

Well, on to another subject. I wanted to show those of you who haven't played with primas just what the bottles of "Got Primas" look like. They are AWESOME, and I love them! They are my favorite new embellishment. There are hundreds in each bottle, and at Scrap-A-Latte you get them for just FIVE DOLLARS a bottle!! Usually they retail for $6.95 and so and UP! So, here's the pictures and the link to Scrap-A-Latte : http://www.scrap-a-latte.net/store/home.php 
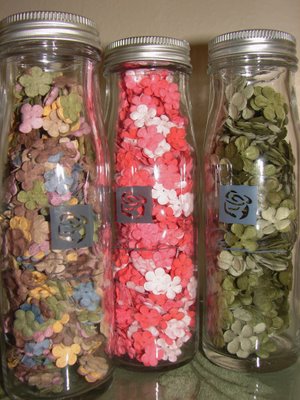
The flowers in the bottle on the left are from the "vintage" color assortment and they are the small size. The ones in the middle are also small and are the coral assortment. The right flowers are from the green assortment and are medium sized. I should have shown you the large sized ones too, but didn't think of it when I took the picture. The flowers are able to be layered small, medium, large for great effects. If you go to Scrap-A-Latte to buy them (they have flat-rate shipping of only $5.25) please put my e-mail address in the comments section of your order (
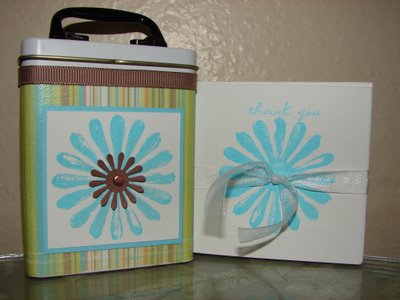
mcclellans@stx.rr.com) so that I get a $5 store credit. If you refer people tell them to do the same for you! Take care.

November 2, 2006

What I did Today

I got a lot done. I finished 9 post-it note holders, 9 beaded pens, one checkbook cover and beaded pen, 2 band-aid tins with little coordinating 3 x 3 thank you cards bundled with them, 12 more cards, and frame with the word FAITH in it. I also began organizing all of my items in the baskets and bins that they'll go in, along with collecting catalogs to take. It doesn't sound like I did much, but it was a lot and I still have at least that much more work to do! Below, you'll see some pictures of a couple of the items I made.

These first two pictures are the two little band-aid tins I made, along with their accompanying thank you notes. The thank you notes have ribbon tied around them to secure them - it's not actually part of the cards.

The next picture is the FAITH frame that I made. All of the pictures posted today seem brighter than they actually are. In this particular picture, I feel like in real life the colors match better. All of the items used in the making of the framed art come from SU! so they all match perfectly even though they don't really appear to here. The scriptures is Hebrews 11:1 and it says, "Now faith is the substance of things hoped for, the evidence of things not seen." The frame might have been prettier without the scripture on the bottom and with the word centered, but I really wanted the scripture on there....I hope you like it!

Ahhh!!

I've only got today and tomorrow to finish up for the craft show!!! I'm not going to spend much time posting today. Attached below, you'll see one of the card organizer tins I've made. Inside it has 6 tabbed dividers that I also made. I hope you like it, and wish me luck!!!

November 1, 2006

Computers and Technology - Love/Hate relationship

That is SO weird! I just (at 8:03 a.m. central time) posted what I had tried to post for a few hours last night. I even put in the title that it was "yesterday." Well, if you look below the post, it says yesterday's date!! Strange.

I am pretty darn good with computers. At the Air Force Academy we had to use them for all sorts of things like for class, and also for military stuff. I am very proficient in most all Windows applications. I even "get" coding a little bit. I hate it when my computer won't do what I want though, and I can't figure it out. That's when I want to chuck it out the window. Computers can do so much for us, but they make me feel a similar feeling to what I guess "road-ragers" (is that a word?) feel. I can't wait for a computer that doesn't freeze up. I can't wait for a computer that after about 6 months, doesn't work as quickly. We defrag ours all the time, clear out our temp files, and all sorts of other things, but inevitably, it will start being slow (even with a broadband connection) and then I start to hate it. Maybe the computer manufacturers do that on purpose so we'll buy a new one? I don't know, but enough venting. Enjoy "yesterday's" post!!!!

October 31, 2006

(Yesterday....) Happy Halloween!

I tried and tried to get this to post yesterday, but Blogspot seemed to be having issues. Here's what I said in the post that was supposed to go through yesterday:

Happy Halloween everyone! I will post a couple of pictures of what I worked on today for my craft fair, and I will post a couple of pictures of my 2 beautiful little girls.

First, here are pictures of just a couple of the calendar/post-it note holders I made today.
This last group of pictures are of the girls before we went Trick-or-Treating. Emma (my 3-year old) wanted to be Belle because Belle wears a yellow dress. Yellow, of course, is Emma's favorite color. Sarah (my 2-year old) was Tinkerbelle because it was the cutest costume we could find in her size. Sarah has a rash on her face, unfortunately, from being sick (like me). When a 2-year old blows their nose a lot, they tend to do a lot of wiping of their face and it has really irritated her skin. I wish I could airbrush it off!!! Anyway, enjoy!