***Please note that after switching from several different hosts before settling on Blogger, the formatting of my pictures may not be as it was originally intended. I simply don't have the time to go back through years of posts in order to fix the orientation of the pictures. Sometimes a picture just shows a box of text in its place, but clicking on it will allow you to see the picture. Others, there may be no picture at all. I apologize.***

November 20, 2006

I will be out of town for a while....

We get to go visit my husband's family in Mesa, AZ after all and I'm so excited! I'm excited partly for all of the shopping I can do there - they have real stores like Jo-Ann's, Michael's, Hobby Lobby, TARGET, etc.!!!!!! Mostly I'm excited because we get to see some family that we haven't seen in a while and my sister-in-law is going to make the trip as well with her family. They weren't going to at first, and then her husband surprised her with getting vacation time so that they could go. Anyway, happy Thanksgiving to all of you. I hope that you're able to take the time to enjoy all of the blessings you have, and can perhaps take the time to help someone else during this holiday season who is less fortunate. I won't be posting until around the 4th of December. I thought I would share a tutorial I found by Laura on her blog, which I view regularly (http://inkydinkydo.blogspot.com), that I think will be really helpful for those of you who want a gorgeous but easy Christmas gift to make. They're glitter ornaments, and her tutorial is outstanding. I've seen several, but she really takes the time to show you how to do it with pictures at each step, not just words. Enjoy, view her blog and tell her thanks, and take care everyone!!!


Laura's Tutorial:


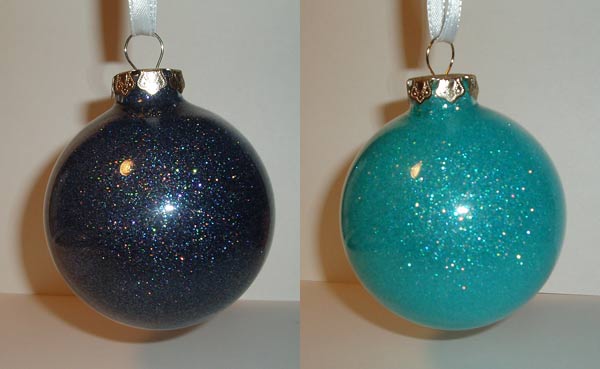
Ok here goes, my very first tutorial. I've never written one of these before, but I had so much fun making these ornaments, that I thought everyone should know how! The 1st one is Night of Navy and the 2nd one is Cool Caribbean. I also made one with Marigold Morning, but the picture made it look orange and not very pretty, but it's gorgeous IRL!
First carefully take the metal hanger off your ornament. Then add about 20 drops of reinker. I used Cranberry Crisp for this tutorial. (see pic 1) Then you need to swirl the ink around inside the ornament until it coats the inside completely. (see pic 2) After you have the entire inside coated, turn the ornament upside down so that it can drain into something. (see pic 3)
Ok now you need to use some sort of funnel to add the glitter. I just made one from scrap copy paper. (see pic 4) Add about 1 1/2 teaspoon of ultra fine glitter to the ornament. (see pic 5) Now here comes the fun part! Take your thumb and COMPLETELY cover the opening. (I have tiny hands and I can do this, so you should be able to as well.) (see pic 6) Now SHAKE the ornament. Shake it hard, but be careful not to hit it on anything. You want to shake it and not roll the glitter around inside, rolling it will create lines in the glitter, while shaking it will give a smoother look.
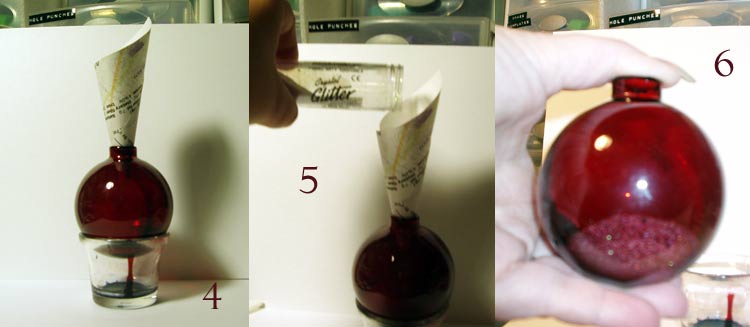
Now you want to have a plastic baggie ready to catch the excess glitter. This is the bonus of this technique. You now have custom colored glitter you can use on other projects! (see pics 7 & 8) Let the ornament dry for a few minutes and replace the metal hanger. Your custom glitter ornament is done! These are so much fun and SO easy to make!

November 18, 2006

Christmas Gift Swap

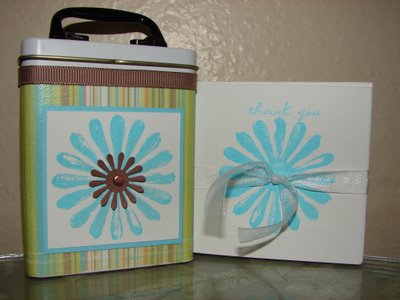
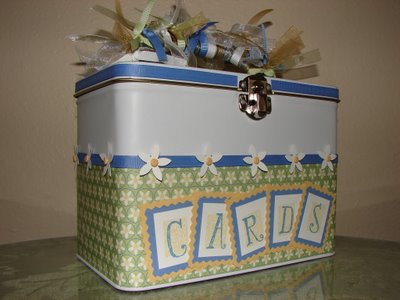
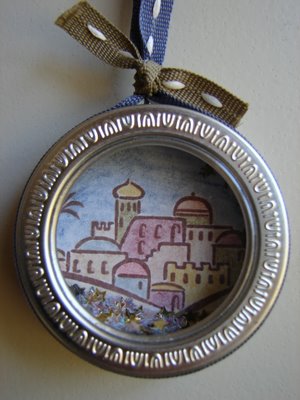
Well, this is what I've been working on on and off since Wednesday. It's finally done! I had to make 22 of them. For those of you who have actually been reading my blog since its inception, you will recognize this little ornament. I made a few minor changes (no embossing, more star glitter, different ribbon and ribbon attachment) but I still like this one just as much as the first. I hope you enjoy it! These are the large Maya Road Journey Tins that can be found at the Frantic Stamper website here: http://www.franticstamper.com/maya-emb.htm I used Stacy's CM circle cutting system and there was a circle in it that fit PERFECTLY! Thanks Stacy for saving me hours of cutting circles!!!! Enjoy!

November 16, 2006

HAPPY BIRTHDAY MOM!!!

It's my mom's birthday today, so I wanted to take a minute to say happy birthday to her. She has definitely been the most inspirational woman in my life. I can see a little of her in me from time to time, and it's always when I feel like I'm being a positive influence on the world, or on someone else. She is always more concerned about others than she is about herself. She is a teacher, and loves to learn about everything. Her students always love her because she wants them to be genuine, and she teaches us to love ourselves for who we are and that we don't need to fit some mold and be someone we're not. I only hope to be able to love others as she does. So, happy birthday Mom, you deserve it!!!!!

I wanted to update my readers. I've been super busy this week with something to do/somewhere to be each night. My husband goes on a short weekend TDY this Friday (which oh so conveniently takes him straight to where his brother is getting married, so the trip to the wedding is on the AF! Congrats Doug and Heather!!!), so I'll be too busy tring to watch the girls and finish up some gifts/cards for swaps I'm in that got HUGE (16+ people in BOTH!) to post anything probably until Monday. We have friends coming to dinner Sunday that are going to be moving soon (I'm sad - I will miss them!) and then Tuesday we drive to Mesa for Thanksgiving and won't get back until the 1st. So - you won't be hearing from me for a while. I will do my best to post my swap items on here before I go so that at least at the top of the screen is a stamped item - not words from me blabbing.

Take care, and make it a great day!

November 14, 2006

Make It, Bake It, Grow It

The ladies in my husband's squadron (where he works) are having our annual Make It, Bake It, Grow It auction to raise money for the squadron. Last year I had just decided to soon become a demonstrator and donated 10 cards that sold for $25. Not to bad, but not that great either. This year I've made a gift basket that contains 8 Holiday cards/envelopes, a beaded pen, a post-it note holder, a refrigerator calendar, a domino ornament, and a mini composition book. The colors were inspired by the tin that they will come in (behind all of the objects in the picture). It has a color close to Pink Passion, one that's pretty much Certainly Celery, and another that is super close to Garden Green. So, using this color theme (ignoring the odd-colored blue snowflakes) I created these projects. I didn't want the composition book, pen, calendar, or post-it note holder to be themed to Christmas so that someone would feel weird using them in July, for instance. The cards and ornament though, I was able to tie the penguins in with the colors used by using the little penguin from the Wild About You stamp set. I love that little guy! Anyway, I hope you like it, and I hope it earns lots of money for the squadron!!!

November 11, 2006

Faux Postage

Thanks for bearing with me. I've been taking a break from stamping after the stamping frenzy I went through in preparation for that craft fair that I recently participated in. Today I'm going to spotlight a technique that I tried for the very first time called faux postage. It's really fun and easy to do. I made these cards for the craft fair, so some of you that visited my table might have seen them already. Here's the link to the tutorial that I followed to make my cards so that you can make them on your own. It's easy to follow and has pictures and step-by-step instructions. It is from splitcoaststampers.com: http://www.splitcoaststampers.com/resources/fauxpostage.php

This technique is really fun, and I look forward to playing around with it some more. My cards were made with the intent in mind to make it non-traditional Christmas colors. I used Almost Amethyst and Lovely Lilac which I really like the monotone look of. To jazz it up a little, if you can see the words, I stamped Merry & Bright and put dazzling diamonds glitter all over it. I used my large oval punch to make the little window for the words. I can't wait for next week though, because I finally ordered the small oval punch and once it comes I will be able to do all sorts of fun things with it and by combining the use of it with the large oval punch. Anyway, here's my card, and thanks so much for looking!!!

November 7, 2006

Dove Evolution

This is the strangest thing to watch, and then realize that we see it every day and don't realize it. Just take a look at the pictures you see around you in magazines, on billboards, on tv....

Tags, tags, and more tags!

Those of you who are loyal SU! stampers probably know that SU! is going to have a new tag punch in the upcoming (Dec 1st) Winter Mini Catalog. It is smaller than the current punch, so it makes layering so easy that even my daughter Emma could do it! Well, here is a technique that I learned of long ago, but found a nice summary of it in Amy Ryasvy's blog (Prairie Paper & Ink) on how to make the tags longer than the punched shape you would get otherwise. You can take this method and apply it to the new smaller tag (once we all know how wide it is!) and you can have tags of any size! Thanks Amy, and like she says, I hop this helps someone! Enjoy!

From Amy's blog:

"Extending" Your Tag Punch
Did you know you can make longer tags w/ your tag punch?? I remember being told I could do this back when the punch was first released but I didn't get *how* till I actually saw it.
So for some of you this is old news but hopefully this will be the "Aha!!!" moment for *someone*!! LOL
Basically all you do is cut a strip of CS several inches long and (for this particular punch) 1 3/8" wide (the width will vary if you're using different punches).
Then all you do is pull the CS through the punch like so:
So then all you're really punching is the top portion - that way you get tags in any length you desire!!
Cool eh??

So there on the right you can see a tag just punched w/ the Tag Punch (far right) and one that I pulled through and made longer.
So there's a *super* simple way to get more use out of your Tag Punch! I HTH someone!! :o)

November 6, 2006

It's Over!

Finally, the craft fair is behind me. I did well. I figured that here in Del Rio, if I could MAKE money, I would be happy with the result. Well, I did. I learned a lot though in the process. Here, I can't sell anything for over $10 so if it's worth that, then it's not worth my time making it because it won't sell. I guess people here aren't into hand-made items that are NICE. They bought all of my cutesy stuff that was inexpensive, but the nice things I had for sale like lunchbox tins (card organizers), "name" frames that they could custom order, and even candles didn't sell at all. I didn't sell ANY bundles of cards. I had my cards priced $2.50 each which is on the cheap side for a hand-made card, or 6 for $10 and I only sold them as onsie-twosies. Oh well, now I don't have to make ANY of the 50 or so Christmas cards I was going to have to make. Post-it note holders with beaded pens, and domino ornaments and refrigerator magnets, along with refrigerator calendars sold the best. But they were only as much as $6.00 and the magnets were only $1.00. I think I'll do this again next year, but now I know what to expect. I'm glad that I didn't go in with high expectations. I did think cards would sell better, but one lady commented to me that they just e-mail people now. How silly!!!!

Well, on to another subject. I wanted to show those of you who haven't played with primas just what the bottles of "Got Primas" look like. They are AWESOME, and I love them! They are my favorite new embellishment. There are hundreds in each bottle, and at Scrap-A-Latte you get them for just FIVE DOLLARS a bottle!! Usually they retail for $6.95 and so and UP! So, here's the pictures and the link to Scrap-A-Latte : http://www.scrap-a-latte.net/store/home.php 
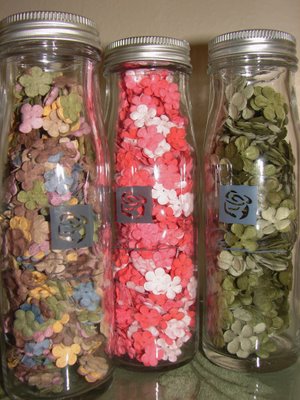
The flowers in the bottle on the left are from the "vintage" color assortment and they are the small size. The ones in the middle are also small and are the coral assortment. The right flowers are from the green assortment and are medium sized. I should have shown you the large sized ones too, but didn't think of it when I took the picture. The flowers are able to be layered small, medium, large for great effects. If you go to Scrap-A-Latte to buy them (they have flat-rate shipping of only $5.25) please put my e-mail address in the comments section of your order (mcclellans@stx.rr.com) so that I get a $5 store credit. If you refer people tell them to do the same for you! Take care.

November 2, 2006

What I did Today

I got a lot done. I finished 9 post-it note holders, 9 beaded pens, one checkbook cover and beaded pen, 2 band-aid tins with little coordinating 3 x 3 thank you cards bundled with them, 12 more cards, and frame with the word FAITH in it. I also began organizing all of my items in the baskets and bins that they'll go in, along with collecting catalogs to take. It doesn't sound like I did much, but it was a lot and I still have at least that much more work to do! Below, you'll see some pictures of a couple of the items I made.

These first two pictures are the two little band-aid tins I made, along with their accompanying thank you notes. The thank you notes have ribbon tied around them to secure them - it's not actually part of the cards.

The next picture is the FAITH frame that I made. All of the pictures posted today seem brighter than they actually are. In this particular picture, I feel like in real life the colors match better. All of the items used in the making of the framed art come from SU! so they all match perfectly even though they don't really appear to here. The scriptures is Hebrews 11:1 and it says, "Now faith is the substance of things hoped for, the evidence of things not seen." The frame might have been prettier without the scripture on the bottom and with the word centered, but I really wanted the scripture on there....I hope you like it!

Ahhh!!

I've only got today and tomorrow to finish up for the craft show!!! I'm not going to spend much time posting today. Attached below, you'll see one of the card organizer tins I've made. Inside it has 6 tabbed dividers that I also made. I hope you like it, and wish me luck!!!

November 1, 2006

Computers and Technology - Love/Hate relationship

That is SO weird! I just (at 8:03 a.m. central time) posted what I had tried to post for a few hours last night. I even put in the title that it was "yesterday." Well, if you look below the post, it says yesterday's date!! Strange.

I am pretty darn good with computers. At the Air Force Academy we had to use them for all sorts of things like for class, and also for military stuff. I am very proficient in most all Windows applications. I even "get" coding a little bit. I hate it when my computer won't do what I want though, and I can't figure it out. That's when I want to chuck it out the window. Computers can do so much for us, but they make me feel a similar feeling to what I guess "road-ragers" (is that a word?) feel. I can't wait for a computer that doesn't freeze up. I can't wait for a computer that after about 6 months, doesn't work as quickly. We defrag ours all the time, clear out our temp files, and all sorts of other things, but inevitably, it will start being slow (even with a broadband connection) and then I start to hate it. Maybe the computer manufacturers do that on purpose so we'll buy a new one? I don't know, but enough venting. Enjoy "yesterday's" post!!!!